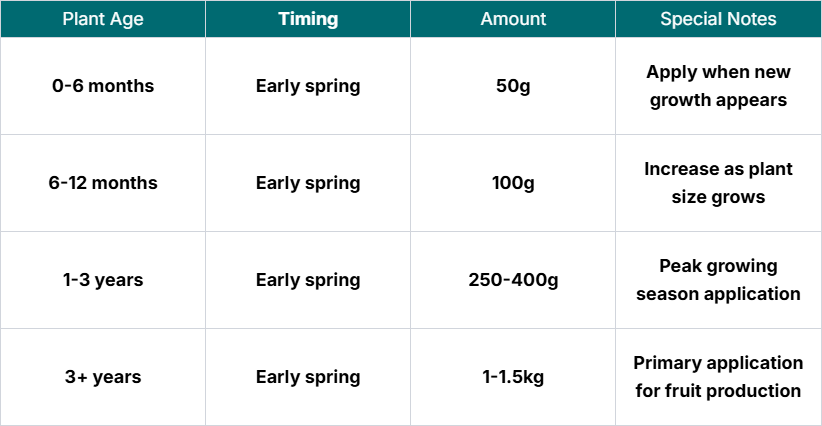
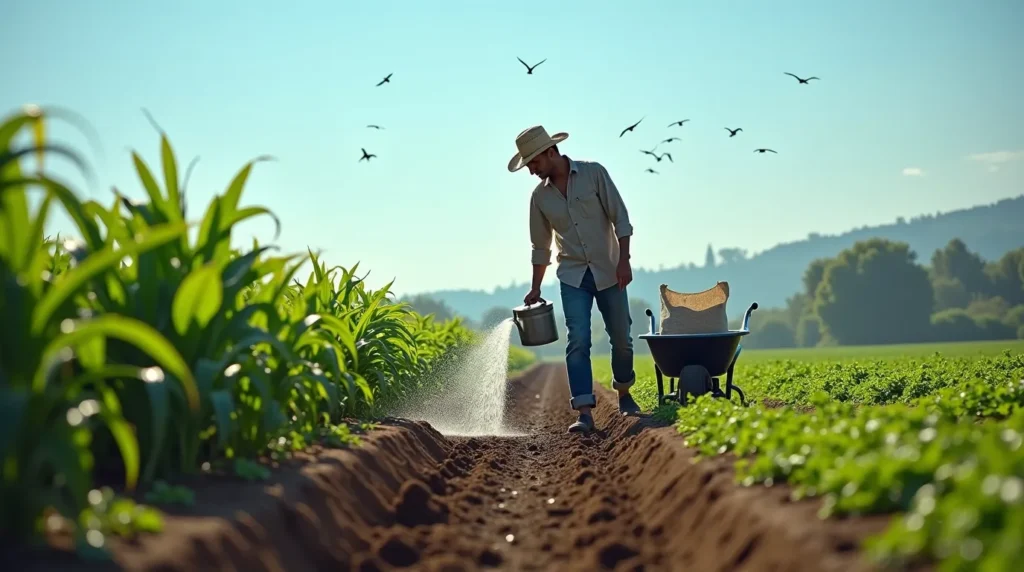
Fertilizer Schedule by Plant Age
This blog is to give the basic information on how to use fertilizer. I’m not an agronomist; this is just to guide you on how to apply the fertilizer on plants based on research I did.
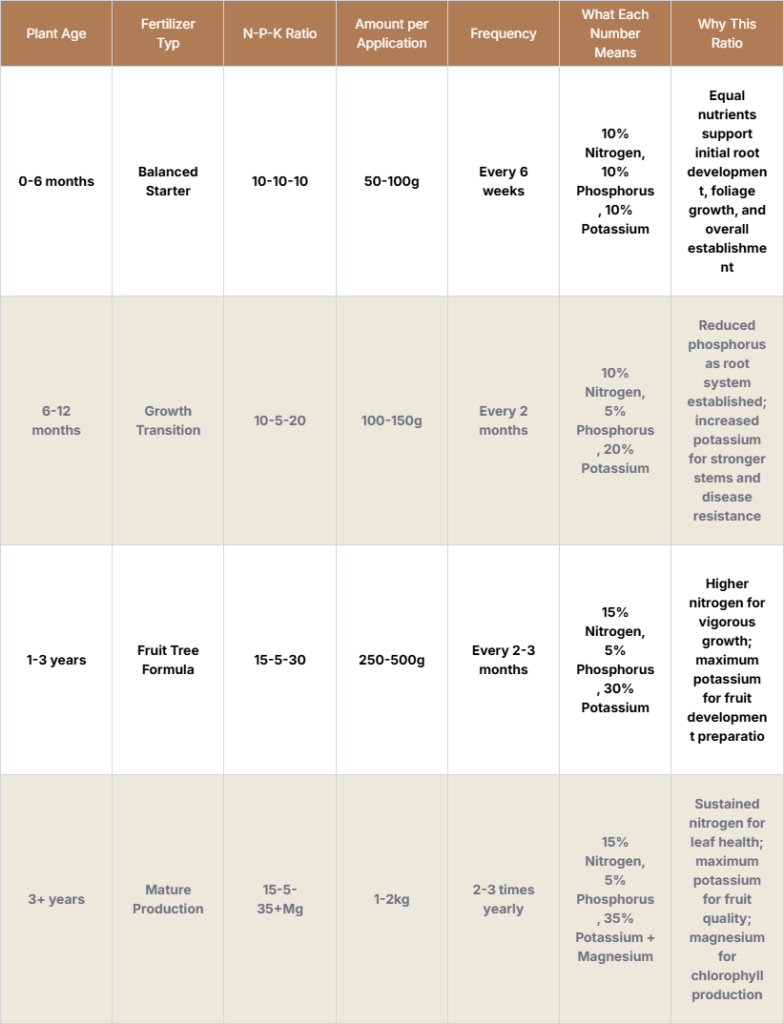
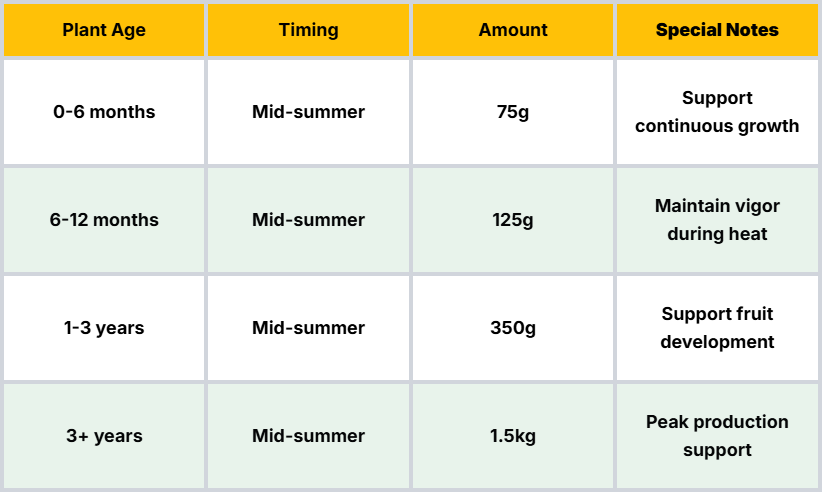
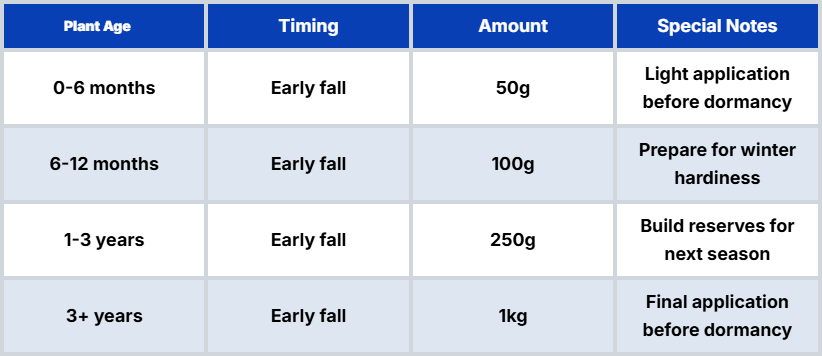
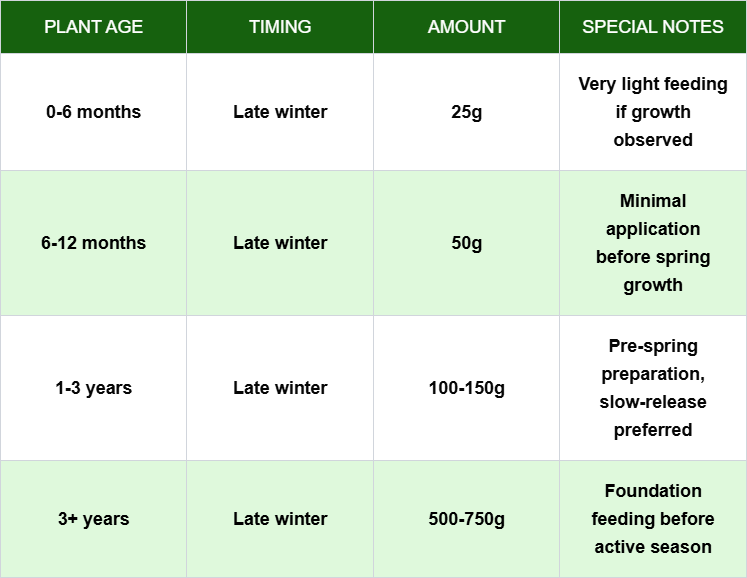
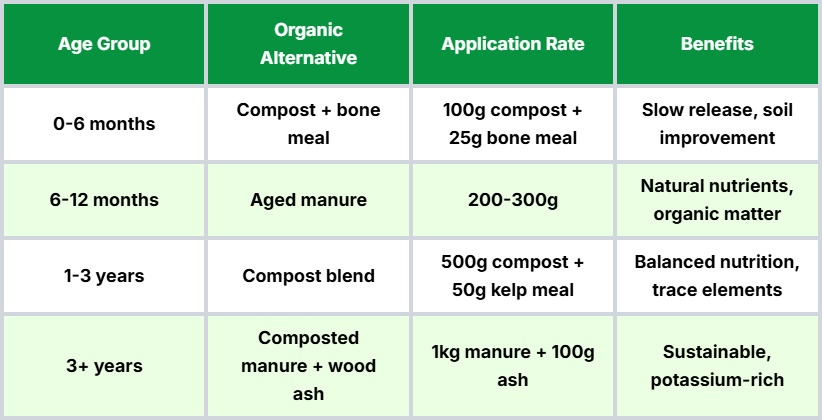
Fertilizer Application Schedule
How to Make Compost: A Complete Guide
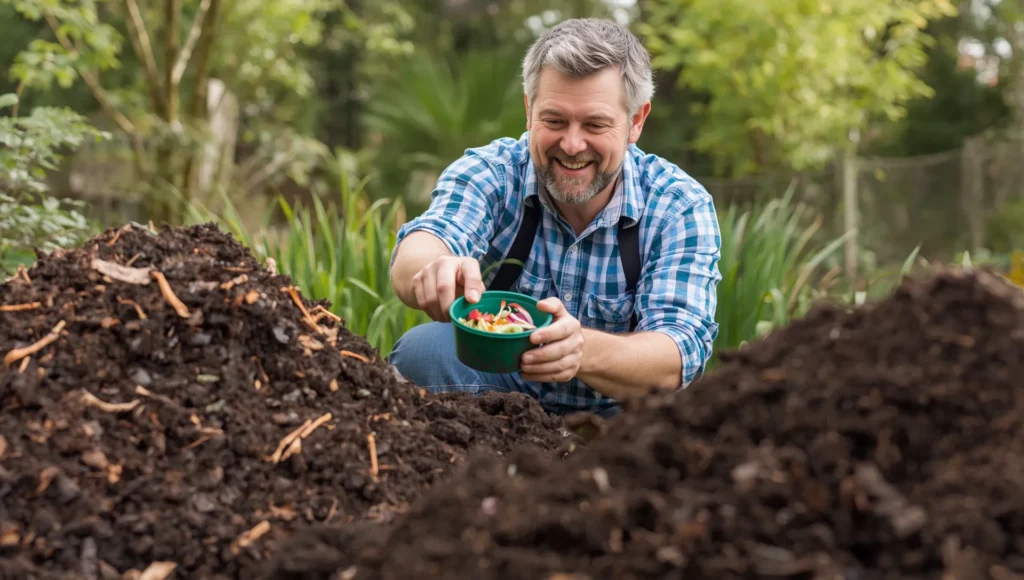
What is composting?
Composting is the natural process of recycling organic material food scraps, yard waste into a useful amendment for soil. Microorganisms break down organic material in an aerobic environment, generating nutrient-rich “black gold” for your plants.
Basic Principles of Composting:
What happens?
- Microorganisms (bacteria, fungi) consume organic material
Heat is produced during microbial activity (130-160°F for active compost)
Material is broken down into simpler compounds
Finished product is dark, crumbly and smells earthy
What you need:
- Carbon material (“browns”) dry, woody materials
- Nitrogen material (“greens”) fresh moist materials
- Oxygen—through aerobic activity
- Moisture—proper water levels
- Time—3-12 months depending on technique
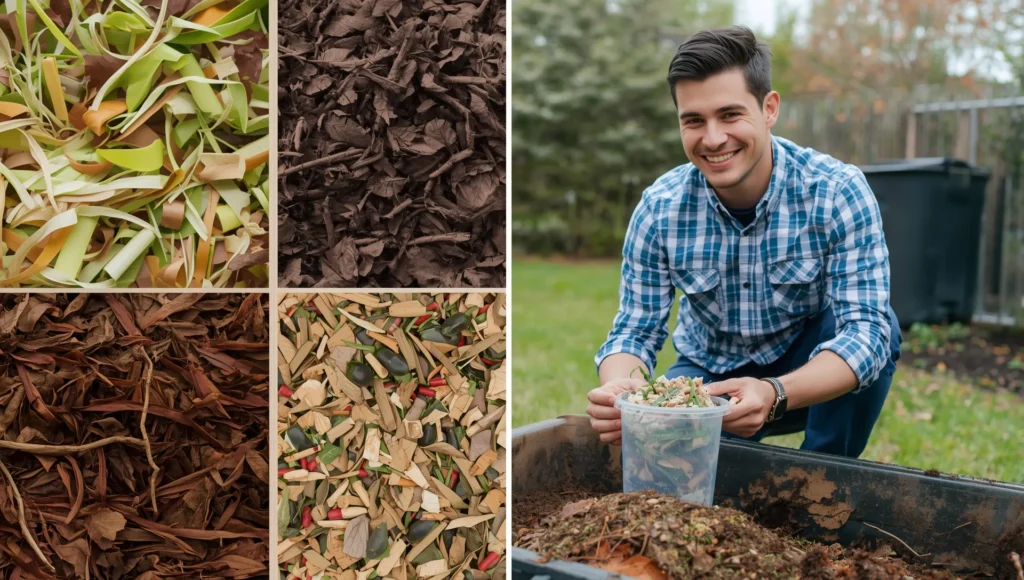
The Carbon-Nitrogen Ratio:
Brown materials (carbon-rich):
- Dry leaves—great for carbon
- Shredded newspaper/cardboard—non-glossy, printed ink
- Wood chips/sawdust—avoid treated wood
- Straw/hay—avoid fresh grass clippings
- Corn stalks—chop small
- Pine needles—limited use (acidic)
Green materials (nitrogen rich):
- Kitchen scraps—vegetable skins, fruit scraps, coffee grounds
- Fresh grass clippings—lay thin
- Garden trimmings—soft green plant material
- Manure—from herbivores only (cow, horse, rabbit)
- Seaweed—if available, great addition
The Ideal Ratio:
30:1 Carbon to Nitrogen (by weight)
- In practical approach: About 3 parts brown to 1 part green (by volume)
- Rule of thumb: For every layer of green, cover with 3x more brown material
The Don'ts: What should NOT go into compost?
- Meat, fish and bones—attracts pests and creates smell
- Dairy—milk, cheese, butter (attracts pests)
- Fats/oils—slow to break down, attracts animals
- Pet waste—dog/cats have parasites that are not good for gardens
- Diseased plants—promotes diseases among plants
- Seeds from weeds—unless you’re achieving high temperatures in compost
- Wood products with treatment—contains chemicals that are toxic
Use With Caution:
- Citrus peels – acidic, use small amounts
- Onion/garlic scraps – can repel beneficial worms
- Glossy paper – may contain harmful inks
- Human waste – never appropriate for home composting
4 Composting Methods To Try Out
1. Hot Composting (Berkeley Method)
The Berkeley Method of hot composting is a fast, high-temperature composting technique developed by the University of California, Berkeley, that produces finished compost in about 18 days.
It requires maintaining the compost pile’s temperature between 55-65°C (131-149°F) and a carbon-to-nitrogen (C:N) ratio of around 25-30:1. The ideal compost pile size is roughly 1 meter by 1 meter wide and 1.5 meters high.
The basic steps are:
Day 1: Build the compost heap by layering alternating thin layers of greens (nitrogen-rich materials) and browns (carbon-rich materials). Wet the pile thoroughly until water drips from the bottom. Optionally, add a compost activator such as comfrey, nettle, urine, or old compost at the center.
Days 2-4: Let the pile sit without turning to allow microbial activity to begin and heat to build up.
Day 5: Turn the compost by moving the outside layers to the center and the inside layers to the outside (essentially turning the pile “inside-out”). Maintain moisture at about one drop of water released when squeezing a handful.
Days 6-18: Turn the pile every second day, continuing to monitor moisture and temperature. The peak temperature of 55-65°C occurs typically between days 7 and 9, which kills most pathogens and weed seeds.
Day 18: The compost should be finished and ready to mature or use.
The method emphasizes careful turning and moisture control to sustain thermophilic (heat-loving) microbes, which accelerate decomposition. The pile size and C:N balance are crucial for generating and maintaining heat.
This approach is used in a batch system and can be adapted to two or four-bin systems for continuous composting.
The Berkeley hot composting method produces rich, high-quality compost fast, helping to reduce waste and improve soil health effectively.
2. Cold Composting (Passive Method)
Cold composting refers to a passive composting method which allows for decomposition of organic material over time without added heat. This means it takes a year or more to come to completion to create finished compost.
Facts about cold composting (passive method):
- Requires little effort and turning is not needed.
- Materials to be composted are put into a pile or a bin and left alone.
- Passive relies on ambient microbial actions and decomposing macro-organisms such as worms and sowbugs.
- Piles must remain moist (like a wrung out sponge) and balanced between browns (carbon rich materials) and greens (nitrogen rich materials).
- The pile should ideally be in contact with the soil to allow for organisms to gain access to materials.
- Space is larger compared to hot composting as the requirement is longer, cannot be compact.
- Common methods of implementation are through backyard piles, bins or the three-bin system where one bin is used each year with rotation annually.
- Good for the gardener who does not need compost imminently and wants an organic option with little intervention.
Cold composting is eco-friendly but takes time and isn’t as effective at destroying pathogens and weed seeds as hot composting does.
3. Tumbler Composting
A compost tumbler is a drum style compost bin that turns for easy turning and faster composting compared to standard compost bins. Tumblers are typically elevated which means less issues with pests and the way they are designed, they get good aeration since turning the contents provides oxygen that helps decompose faster.
Key features and benefits include:
Easy turning by rotating the drum a few times each week.
Faster composting due to consistent aeration.
Pest-resistant design as they are sealed and often elevated.
Options between single or dual chambers for batch or continuous composting.
They are placed in sunny or partially shaded spots to help heat and accelerate breakdown.
Materials that can be used in a compost tumbler come from a ratio of greens (nitrogen-rich) like fruit and vegetable scraps, coffee grounds, and manure; and browns (carbon-rich) like dead leaves, straw, sawdust, and shredded paper. What should not be added include meat, fish, dairy, bones, pet feces, oils, and diseased plants.
To maintain a tumbler:
Add materials gradually and turn the tumbler a few times weekly.
Maintain moisture by adding dry browns if too wet or a bit of water if too dry.
Compost typically finishes in 6 to 8 weeks in warm weather.
Empty the compost either by rotating it out into a container or scooping it out.
A dual-chamber compost tumbler allows the user to compost year-round since one chamber can be continuously filled while the other is left to break down; simultaneously, how often one tumbles and a good mix of ingredients helps achieve the best results.
In short, a compost tumbler is a contained, faster, cleaner way to compost instead of an open bin and is appropriate for kitchen and garden scraps for households of any size.
4.Vermicomposting (Worm Composting)
Vermicomposting refers to “worm composting” as a way to compost using specific types of earthworms to create nutrient-rich compost known as vermicast or worm castings.
This differs from hot composting as hot composting relies on thermal energy and microbes which require heat; vermicomposting is a “cold” process that employs mesophilic microbes and worms for breakdown.
The characteristics and process of vermicomposting are as follows:
- Worms eat food scraps, and bedding materials and poop out worm castings which is a nutrient dense type of compost.
- It needs an aerobic process (with air) and moisture.
- Bedding should be layered thin (1-2 inches) to keep worms happy and not too hot.
- The process takes some time, up to six months for finished product although optimal conditions can allow completed compost in as little as 8 weeks.
- It does not kill weed seeds or pathogens because it never gets that hot but does create a compost with higher levels of nitrogen.
Worm castings can be harvested through “bait and switch” where the top inch is removed to separate worms from finished compost or by digging it all out and returning worms with bedding back to bin.
- Vermicompost is a soil amendment and/or a slow release fertilizer that can be mixed into potting soil or placed around plants.
- When feeding worms on a large scale, however, precomposting (partial hot composting) is essential to stabilize feedstock and reduce pathogens beforehand.
Vermicomposting is appropriate for small-scale composting at home since it takes little space and little effort and the compost produced is high quality for gardens and soil health.
Seasonal Composting Tips
Spring Application (Primary Growing Season)
- Perfect time to start new piles
- Abundant green materials available
- Turn winter piles to restart activity
- Plant compost-loving plants
Summer Application (Sustaining Growth)
- Monitor moisture levels closely
- Add water during dry spells
- Harvest early compost for garden use
- Collect and store fall leaves for future use
Fall Application (Preparation for Dormancy)
- Collect fallen leaves for brown materials
- Turn piles before winter
- Cover piles to maintain moisture
- Last chance to start hot composting
Winter Application (Dormant Season Maintenance)
- Composting slows but continues
- Add kitchen scraps to pile
- Plan next year’s composting system
- Indoor vermicomposting works well
Composting transforms waste into garden gold while reducing your environmental footprint. Start small, learn as you go, and enjoy creating this valuable soil amendment for your plants!
Step-by-Step Hot Composting Guide
Materials Needed:
- Needed: Brown: 9 cubic feet (about 6 large garbage bags of leaves)
- Green: 3 cubic feet (about 2 bags of kitchen scraps)
- Water: Garden hose or watering can Tools: Pitchfork or shovel for
- turning. Thermometer (optional but helpful)
Week 1: Pile Construction Days 1 and 2:
- Find location with good drainage, partial shade.
- Create 6-inch layer of coarse brown material (corn stalks, thick twigs).
- Create 2-inch layer of green material.
- Sprinkle both layers with water (moisture like a wrung-out sponge).
- Add second and third 6-inch layers of the respective materials.
- Repeat layering until the pile is 3 feet high.
- Lightly water layers
Days 3 and 4:
- Take temperature (expected to rise).
- The pile will settle over days 3 and 4, heating up to 130-160 degrees.
- Do not turn just yet; initial heating must occur.
Week 2:
Initial Heating Turns Days 5, 7, and 10:
- Turn whole pile, bringing outside material to the center.
- Check for moisture levels and add if too dry.
- The pile should reheat within 24 hours of turning and should return to 130-160 degrees.
Signs it’s working:
- Steam escaping the pile on cool mornings.
- Pleasant earthy aroma (not putrid)
- Materials breaking down.
Weeks 3-4:
Weekly Turning Turns Week 3/Week 4:
- Turn the pile once per week.
- The temperature will drop gradually as it has already peaked.
- The content becomes less recognizable.
- Volume decreases by about 50%.
Months 2-3:
Final Heating Stage Month 1-3:
- Turn every month or turn less frequently.
- The temperature will closely resemble room temperature.
- Materials turn dark and crumbly.
- When no longer hot and smelling earthy, the compost is finished.
Simple Container Composting Setup
Materials Needed:
- Large plastic storage bin (18+ gallon capacity)
- Drill with 1/4-inch bit
- Wire mesh or landscape fabric
- Bricks or blocks for elevation
Assembly Steps:
- Drill drainage holes in bottom every 4-6 inches
- Drill air holes in sides every 6 inches, 2 rows
- Line bottom with wire mesh to keep contents in
- Elevate bin on bricks for drainage
- Add initial materials using layering method
Maintenance:
- Add materials weekly in proper ratios
- Stir contents every 2 weeks with long stick
- Keep contents moist but not soggy
- Harvest finished compost from bottom every 6 months
Troubleshooting Common Problems
1.Problem: Pile Smells Bad
Causes:
- Too much green material (nitrogen)
- Too wet
- Not enough oxygen
Solutions:
- Add more brown materials
- Turn pile to add oxygen
- Add dry materials to absorb excess moisture
2.Problem: Pile Not Heating Up
Causes:
- Too much brown material (carbon)
- Too dry
- Pile too small
Solutions:
- Add more green materials
- Add water gradually
- Build larger pile (minimum 3x3x3 feet)
3.Problem: Pile Attracts Pests
Causes:
- Wrong materials (meat, fats)
- Food scraps not buried properly
Solutions:
- Remove inappropriate materials
- Bury food scraps in center of pile
- Cover with brown materials
- Use enclosed bin or tumbler
4.Problem: Materials Not Breaking Down
Causes:
- Pieces too large
- Not enough moisture
- Not enough nitrogen
Solutions:
- Chop materials smaller
- Add water gradually
- Add fresh green materials
Detailed Nutrient Breakdown
Nitrogen (N) - The Growth Engine
- Function: Promotes leaf and stem growth, chlorophyll production
- Young plants (0-6 months): 10% provides gentle growth stimulation
- Mature plants (3+ years): 15% maintains healthy foliage for photosynthesis
- Signs of deficiency: Yellowing leaves, stunted growth
- Signs of excess: Excessive leafy growth, delayed fruiting
Phosphorus (P) - The Root Builder
- Function: Root development, flower/fruit formation, energy transfer
- Young plants (0-6 months): 10% crucial for initial root establishment
- Mature plants (1+ years): 5% sufficient once root system developed
- Signs of deficiency: Purple leaf tinge, poor root development
- Signs of excess: Reduced uptake of other nutrients
Potassium (K) - The Strength Provider
- Function: Disease resistance, fruit quality, water regulation
- Young plants (0-6 months): 10% for basic plant functions
- Mature plants (3+ years): 35% maximizes fruit size and quality
- Signs of deficiency: Brown leaf edges, poor fruit development
- Signs of excess: Reduced magnesium and calcium uptake
Magnesium (Mg) - The Chlorophyll Activator
- Function: Chlorophyll production, enzyme activation
- Added to mature plant fertilizer: Essential for photosynthesis
- Signs of deficiency: Yellowing between leaf veins
- Application: Often included as magnesium sulfate (Epsom salt)
Application Methods
Broadcast Method
- Best for: Mature plants (3+ years)
- Technique: Spread evenly around drip line
- Coverage: 1-2 meters from trunk base
- Depth: Work into top 5-10cm of soil
Ring Method
- Best for: Young plants (0-2 years)
- Technique: Create ring 30-60cm from trunk
- Coverage: 15cm wide band
- Depth: Work into top 5cm of soil
Incorporation Method
- Best for: All ages during planting/transplanting
- Technique: Mix with soil before planting
- Coverage: Throughout root zone
- Depth: 15-30cm deep
Water Requirements After Fertilizing

Signs of Proper Fertilization
Healthy Growth Indicators
- Leaf color: Deep green, vibrant appearance
- New growth: Regular signs of new shoots
- Root development: White, healthy roots when visible
- Fruit production: Appropriate for plant age and variety
- Disease resistance: Min
Warning Signs of Over-Fertilization
- Excessive vegetative growth: Too much leaf growth, delayed fruiting
- Leaf burn: Brown, crispy leaf edges
- Salt buildup: White crusty deposits on soil surface
- Reduced flowering: Delayed or reduced flower production
- Pest attraction: Increased signs of insect problems
Storage and Safety Guidelines for Your Fertilizer
Fertilizer Storage
- Location: Cool, dry place away from children and pets
- Container: Original packaging or sealed containers
- Shelf life: 2-3 years when properly stored
- Moisture protection: Keep away from humidity
Application Safety
- Protective equipment: Gloves, eye protection recommended
- Timing: Apply during cool parts of day
- Weather: Avoid application before heavy rain
- Cleanup: Wash hands thoroughly after application
Cost-Effective Alternatives
Organic Options
Budget-Friendly Mixing
- Custom blend: Mix single nutrients (urea, superphosphate, potash)
- Bulk purchasing: Buy larger quantities for cost savings
- Seasonal timing: Purchase during off-season sales
- Group buying: Coordinate with neighbors for bulk discounts
What is Bone Meal?
Bone meal is a slow-release organic fertilizer made from ground up animal bones, typically from cattle that have been processed for meat. The bones are steamed at high temperatures to remove any organic matter, then ground into a fine powder or granular form.
Bone meal is a finely or coarsely ground powder made from defatted, dried animal bones, typically as a by-product of the meat processing industry. It is primarily used as an organic fertilizer and a mineral supplement, offering high levels of phosphorus and calcium, with a modest amount of nitrogen.
As a fertilizer, bone meal is valued for its slow-release supply of phosphorus and calcium that helps support root growth, flowering, and overall plant health. It is particularly effective in acidic soils (pH below 7.0), where its nutrients become more accessible to plants.
Bone meal usually has a typical N-P-K (nitrogen-phosphorus-potassium) ratio such as 3–15–0, indicating it’s mainly a source of phosphorus with limited nitrogen and almost no potassium.
How Bone Meal is Made
Steps:
- Collection – Bones collected from meat processing facilities.
- Cleaning – Bones are cleaned and any remaining meat/fat removed
- Steaming – High-temperature steam treatment (250-300°F) to sterilize
- Drying – Bones are thoroughly dried to remove moisture
- Grinding – Dried bones are ground into powder or small granules
- Screening – Material is sifted to achieve consistent particle size
Quality standard
- Sterilization kills all bacteria and pathogens
- No growth hormones or antibiotics remain after processing
- Organic certification available for organically-raised livestock bones
Nutrient Content
Primary Nutrients:
- Phosphorus (P): 15-20% – The main benefit
- Nitrogen (N): 3-4% – Secondary benefit
- Calcium: 20-25% – Important bonus nutrient
Trace Elements:
- Magnesium: Small amounts
- Zinc: Trace amounts
- Iron: Trace amounts
- Other minerals: Various trace elements from bone composition
Physical Appearances
- Color: Off-white to light tan/beige
- Texture: Fine powder to coarse granules
- Smell: Slight earthy odor (not unpleasant)
- Feel: Gritty, similar to coarse flour
Particle Sizes Available:
- Fine powder: Fastest breakdown (2-3 months)
- Medium granules: Standard release (3-4 months)
- Coarse granules: Slowest release (4-6 months)
How It Works in Soil
Release Mechanism:
- Soil microbes begin breaking down bone meal particles
- Organic acids from plant roots help dissolve phosphorus
- pH levels affect release speed (works best in slightly acidic soil)
- Moisture speeds up the breakdown process
- Temperature affects microbial activity and release rate
Timeline of Nutrient Release:
- Week 1-2: Minimal release, microbes beginning breakdown
- Month 1-2: Steady phosphorus becomes available
- Month 3-4: Peak nutrient availability period
- Month 4-6: Gradual decline as material is consumed
Benefits of Bone Meal
Phosphorus For:
- Root development – Essential for strong, extensive root systems
- Energy transfer – Helps plants move energy around their systems
- Flower/fruit formation – Critical for reproductive growth
- Cell division – Needed for all plant growth processes
- Disease resistance – Stronger plants resist problems better
Calcium for:
- Cell wall strength – Makes plant tissues stronger
- Nutrient uptake – Helps roots absorb other nutrients
- pH buffering – Helps stabilize soil pH
- Enzyme activation – Required for many plant processes
Uses For Gardening
Ideal Applications:
- New plantings – Perfect for establishing root systems
- Bulb planting – Excellent for spring and fall bulbs
- Perennial gardens – Long-term feeding for established plants
- Fruit trees – Supports fruit development
- Root vegetables – Carrots, potatoes, beets benefit greatly
When to Apply:
- Spring planting – Mix into soil before planting
- Fall preparation – Apply to beds for next season
- Transplanting – Mix with backfill soil
- Established plants – Side-dress around plants annually
Limitations and Considerations
When NOT to Use Bone Meal:
- High pH soils – Works poorly in alkaline conditions (pH above 7.5)
- Immediate nutrition needs – Too slow for quick nutrient deficiency fixes
- Annual vegetables – May be overkill for short-season crops
- Phosphorus-rich soils – Soil test may show adequate levels already
Potential Issues:
- Over-application – Too much phosphorus can lock out other nutrients
- Attracts animals – Dogs and wildlife may dig up treated areas
- Slow in cold weather – Works much slower in cool soil temperatures
- pH dependency – Needs slightly acidic conditions to work well
Types Of Bone Meal
Common Forms:
- Steamed bone meal – Standard processed form
- Raw bone meal – Less processed, faster acting
- Blood and bone meal – Combined with blood meal for added nitrogen
- Fish bone meal – Marine alternative with similar properties
Quality Indicators:
- Organic certification – Ensures quality source material
- Guaranteed analysis – Should list N-P-K percentages
- Particle size consistency – Even granules work better
- Fresh appearance – Should not be clumped or discolored
Storage and Handling
Proper Storage:
- Cool, dry location – Prevents clumping and degradation
- Sealed container – Keeps out moisture and pests
- Away from pets – Dogs especially attracted to the scent
- Shelf life – 2-3 years when properly stored
Application Safety:
- Wear gloves – Prevents skin irritation
- Avoid breathing dust – Use mask if applying large amounts
- Wash hands – Always wash after handling
- Keep pets away – Until worked into soil and watered
Cost and Value
Price Range:
- Small bags (2-5 lbs): $8-15
- Medium bags (10-25 lbs): $20-40
- Bulk quantities (50+ lbs): $1-2 p
Cost Effectiveness:
- Long-lasting – One application feeds plants for months
- Concentrated – Small amounts provide significant nutrition
- Soil improvement – Adds organic matter and improves structure
- Reduced need – Less frequent applications than synthetic fertilizers
Bone meal is essentially nature’s slow-release phosphorus supplement , it’s what remains after all the organic components are removed from bones, leaving behind a concentrated source of minerals that plants need for strong root development and healthy growth.
Frequently Asked Questions
What does the N-P-K ratio actually mean on fertilizer bags?
N-P-K represents the percentage by weight of Nitrogen-Phosphorus-Potassium in the fertilizer. A 10-10-10 fertilizer contains 10% nitrogen, 10% phosphorus, and 10% potassium, with the remaining 70% being filler materials, trace elements, and carriers.
Can I use the same fertilizer year-round?
No, plant nutritional needs change dramatically with age and season. Young plants (0-6 months) need balanced nutrition for establishment, while mature plants (3+ years) require high potassium for fruit production. Seasonal applications should also vary in timing and amount.
How do I know if I'm over-fertilizing my plants?
Watch for these warning signs: excessive leafy growth with few flowers/fruits, brown or crispy leaf edges (fertilizer burn), white salt deposits on soil surface, increased pest problems, or delayed flowering. If you see these signs, reduce application rates and increase watering.
Is organic fertilizer better than synthetic fertilizer?
Both have advantages. Organic fertilizers (compost, bone meal) release nutrients slowly, improve soil structure, and feed beneficial microorganisms, but work slower and cost more initially. Synthetic fertilizers provide immediate nutrition and precise nutrient ratios but don’t improve soil health long-term.
How do I calculate the right amount for my specific plant size?
The amounts listed are guidelines for average-sized plants. For smaller plants, reduce by 25-50%. For larger specimens, increase proportionally. A good rule: apply fertilizer in a ring extending from the trunk to the drip line (outer edge of branches).
Contents
- 1 Fertilizer Schedule by Plant Age
- 1.1 How to Make Compost: A Complete Guide
- 1.2 The Carbon-Nitrogen Ratio:
- 1.3 30:1 Carbon to Nitrogen (by weight)
- 1.4 The Don'ts: What should NOT go into compost?
- 1.5 4 Composting Methods To Try Out
- 1.6 Seasonal Composting Tips
- 1.7 Step-by-Step Hot Composting Guide
- 1.8 Materials Needed:
- 1.9 Simple Container Composting Setup
- 1.10 Troubleshooting Common Problems
- 1.10.1 1.Problem: Pile Smells Bad
- 1.10.2 2.Problem: Pile Not Heating Up
- 1.10.3 3.Problem: Pile Attracts Pests
- 1.10.4 4.Problem: Materials Not Breaking Down
- 1.10.5 Detailed Nutrient Breakdown
- 1.10.6 Nitrogen (N) - The Growth Engine
- 1.10.7 Phosphorus (P) - The Root Builder
- 1.10.8 Potassium (K) - The Strength Provider
- 1.10.9 Magnesium (Mg) - The Chlorophyll Activator
- 1.11 Application Methods
- 1.12 Broadcast Method
- 1.13 Ring Method
- 1.14 Incorporation Method
- 1.15 Water Requirements After Fertilizing
- 1.16 Signs of Proper Fertilization
- 1.17 Healthy Growth Indicators
- 1.18 Warning Signs of Over-Fertilization
- 1.19 Storage and Safety Guidelines for Your Fertilizer
- 1.20 Fertilizer Storage
- 1.21 Application Safety
- 1.22 Cost-Effective Alternatives
- 1.23 Organic Options
- 1.24 Budget-Friendly Mixing
- 1.25 What is Bone Meal?
- 1.26 How Bone Meal is Made
- 1.27 How It Works in Soil
- 1.28 Benefits of Bone Meal
- 1.29 Uses For Gardening
- 1.30 Limitations and Considerations
- 1.31 Types Of Bone Meal
- 1.32 Storage and Handling
- 1.33 Cost and Value
- 1.34 Frequently Asked Questions
- 1.35 What does the N-P-K ratio actually mean on fertilizer bags?
- 1.36 Can I use the same fertilizer year-round?
- 1.37 How do I know if I'm over-fertilizing my plants?
- 1.38 Is organic fertilizer better than synthetic fertilizer?
- 1.39 How do I calculate the right amount for my specific plant size?